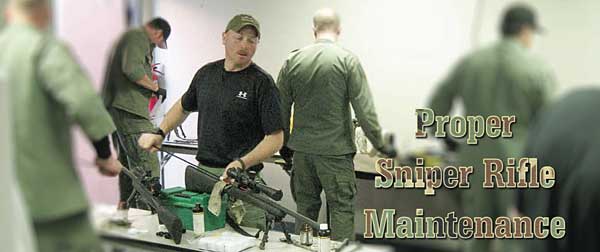
The students had all been indoctrinated in a rather unusual method of cleaning their rifles. It was unusual in that it was totally ineffective (more on this later). To make a bad situation worse, one of my students had recently attended a state sponsored “seminar” which took police snipers out to the 1000 yard line and had them shoot. In my usual sensitive manner, I pointed out that his time would have been better spent learning the proper way to clean his rifle instead of doing “gee whiz” training at two thirds of a mile.
As a sniper, your primary goal is to maximize your potential with your particular weapon and ammo combination in order to be of some tactical use.
One of the ways to attain this goal is, of course, to maintain your equipment in the best possible condition. Cleaning the fouling out of your bore benefits you by maintaining the shot to shot precision of your weapon. It’s also a benefit to your agency because fouling can build up to the point where rifles have to be rebarreled or replaced. Proper cleaning of the bore will delay this expensive procedure.
Over the past several years, many innovative techniques have been developed for this task, initially by the bench rest rifle community. Bench rest shooters are happiest when they place all the shots into a group consisting of one hole. As snipers, we’ll accept a slightly larger group in return for not having to carry a 40 pound rifle up six flights of stairs (not to mention taking 30 minutes to fire a ten round group)!
Perhaps the biggest change realized in weapons cleaning from this community was the move away from purely mechanical cleaning towards the method of “chemical” cleaning.
Mechanical vs. Chemical
Mechanical cleaning is characterized by the act of scrubbing or scouring the bore with a bore brush soaked in some kind of powder solvent or PTFE (PolyTetraFluoroEthylene)-based cleaner/lubricant (such as Break-Free).
Although the above procedure works for powder or carbon fouling, PTFE cleaners were never intended to remove the type of fouling which has the most significant effect on rifle accuracy and barrel life. This, of course, is copper fouling.
When a jacketed bullet travels down a rifle bore, minute traces of the copper jacket are left on the surface of the bore, immediately followed by a layer of powder fouling. As additional rounds are fired, this process is repeated while compressing previous layers deeper into the grain of the metal. The technical term for these alternating layers of carbon and copper has been dubbed “the Dagwood sandwich effect.” If this copper fouling is allowed to remain and accumulate, at some point, accuracy will be seriously degraded. The only way to determine this point with any confidence is to maintain detailed firing records with a shot by shot record of your groups.
In addition to interfering with your rifle’s zero, or accuracy, this layered fouling not only accelerates bore wear, but also serves as a magnet for moisture. For this reason alone, the investment of a little effort and expense will pay dividends in maintaining your long rifle.
The main principle behind chemical cleaning is the use of a solvent which causes a chemical reaction with the copper fouling, changing it into a form which can be more easily removed.
The Materials
Before listing the steps in cleaning, it is necessary to go over the required components:
Bore Cleaner – This is a solvent such as Shooter’s Choice #7 Firearms Bore Cleaner which has an effect on copper fouling, but we will use it here for carbon fouling. There is also another product with the unfortunate name of Shooter’s Choice Black Powder Cleaning Gel. For severe fouling, this gel will stick to the bore and really soak into the fouling. Make sure, however, to always swab it out with patches soaked in bore cleaner.
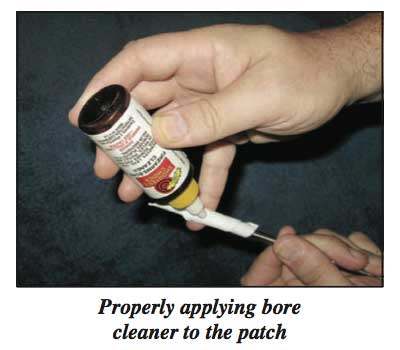
Copper Solvent – Recently, I was introduced to an improved copper solvent which was more stable and didn’t require air to work. For that reason, I now use Shooter’s Choice Copper Solvent. Unless the barrel is still hot, most copper solvents don’t do too good of a job on carbon, but will literally dissolve plated on copper. Don’t leave copper cleaner in the bore for extended periods of time since it attracts moisture.
Lighter Fluid – A bottle of cigarette lighter fluid should be maintained for dipping your bore brush into after cleaning. Lighter fluid serves to deactivate the bore cleaner and prevent it from “eating” the copper out of your bore brush.
Cleaning Rod – Many people don’t realize it, but there are many differences of opinion in the shooting business and many of these differences are on selection of cleaning rods: coated or uncoated; onepiece or sectional; rotating or nonrotating. Several considerations, however, should be kept in mind:
- For law enforcement purposes, sectional rods aren’t necessary since you won’t normally need to carry a disassembled cleaning rod on the belt of your tactical gear. The reason why I prefer onepiece rods is because the sectional rod carries a risk of abrading the bore from loose or ill fitting joints. The joints in a sectional rod also increase the chance of flexing the rod and rubbing against the bore.
- Rods should be made of steel for stiffness. Although the trend for many years was to use a brass or aluminum rod to lessen the risk of bore damage, these rods always flexed when using a tight fitting patch. A steel rod isn’t the enemy; a cleaning rod which flexes is our real worry.
- Rods should be a few thousandths of an inch smaller than the bore. This will also contribute to rod stiffness.
- The best length is one which allows you to push a patch through the muzzle before you have to start bending the rod handle to clear some portion of the rifle’s anatomy.
- If your rod doesn’t come with a carrying tube, you can make one from PVC pipe and a couple of end caps. This keeps the rod clean and helps prevent damage.
- With the solvents necessary to really clean the rifle, the author has yet to see a plastic coated rod not lose its coat, given time – ever. Shooter’s Choice is also used to remove plastic fouling from shotguns and will work on a plastic coating. Once again, if you use a stainless steel cleaning rod, just get into the habit of wiping the rod off every time you run it down the bore.
- Just to eliminate confusion, the military issue, takedown cleaning rod from your department’s AR-15 is not acceptable.
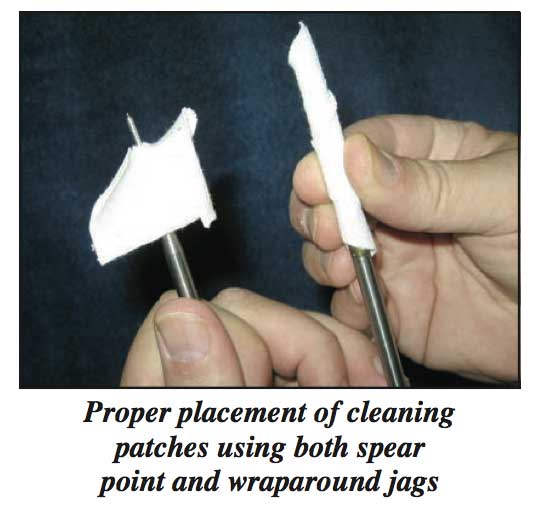
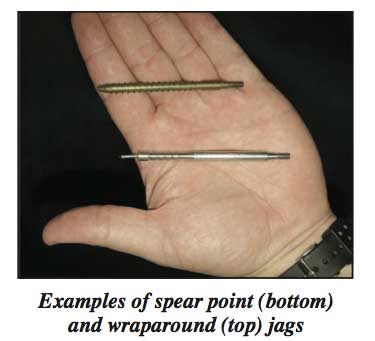
Patch Holder – Don’t use the slotted “eye” type of patch holder. This type will not give you the maximum contact between the patch and the bore. You will also run the risk of the patch holder becoming misaligned to one side by the unevenness of the patch. Only use a jag tip of either the spear point or the Parker Hale wraparound type. A jag is purchased with one bore diameter in mind. This allows the jag to press the full surface of the patch into the rifling.
Bore Brushes – Use a brass cored bronze bore brush. Don’t use a pure copper brush since the chemicals you’ll use will cause the bore to become copper plated on the inside. Use the proper-sized bore brush so that the tips of the bristles aren’t bent as they clean the rifling. (You’ve probably noticed by now that “one size does NOT fit all.”) Order an adequate enough supply so that you won’t be too reluctant to dispose of a worn-out brush. Don’t be afraid to wash your brush after cleaning with a grease cutting dish detergent. This way, by saving dirty brushes, you’ll be better able to afford disposing of a brush with crushed bristles.
Patches – Use cotton patches for their texture and absorbency. Always use the propersized patches. If you are cleaning a .308 Winchester with a spear point jag, your patches need to be one square inch. If using a wraparound jag, patches should be about four square inches. Patches will have to be ordered in bulk for our purposes.
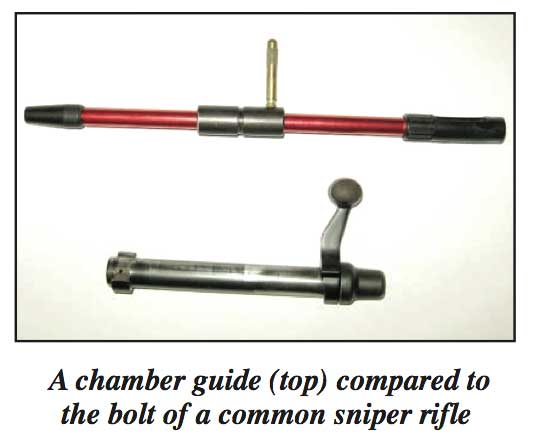
Chamber Guide – Bolt-action rifles are always cleaned from the chamber end, not the muzzle. This has nothing to do with the direction of bullet travel, as some believe, but any rubbing of the cleaning rod on the muzzle crown will have a direct result on your group size. There is another area which needs to be protected, however, and that is the chamber throat. The chamber throat is where the bullet first contacts the rifling. A damaged muzzle crown can be fixed by a gunsmith on an “outpatient basis” by cutting and recrowning the damaged part. A damaged or worn chamber, however, involves removing the barrel and possible replacement, or cutting, rechambering and head spacing the old barrel. For these reasons, a chamber guide is necessary. A chamber guide resembles the rifle bolt which is removed for cleaning. Several types are available, but metal seems to work better than the plastic type. I used a plastic guide for a long time and the solvents which I use began to dissolve it. When selecting a chamber guide, you not only have to order one based on caliber, but often on the rifle model as well. A properly fitting chamber guide will also prevent cleaning solvent from working its way into the glass bedding (if it is glass bedded) of the action.
Lubricant – For years, I’ve been leaning toward dry lubricant systems. I was initially introduced to them in the winter environment while stationed at Fort Devens, MA, with the 10th Special Forces Group. I’ve since experienced their ability to protect and lubricate metal surfaces without attracting dirt or sand. The one system on which I’ve come to rely is produced by Sentry Solutions.
At this point, you’ve probably noticed that I’m pretty specific in specifying materials to be used. That’s because I’ve tried a lot of stuff in the past and this is what works. However, I never want you to use something based on the criteria of “John says so!” so I have two objective tests for the cleaners you put up the bore.
The Burn Test
Cut strips from an aluminum soda can and wash and dry them. Apply your bore cleaner or bore preservative to a strip. While holding it with tongs, light the cleaner on fire. This shows you what happens to your bore cleaner when you fire your first round. For example, have one strip coated with Shooter’s Choice Bore Cleaner and another coated with Break-Free. Light the Shooter’s Choice and you’ll see very little residue after the fire goes out.
Be careful when you light the Break-Free because it’s going to flare up and leave a thick, brown residue which sticks to the aluminum strip. Which one do you want in your bore? To add insult to injury, now try and clean that residue off the aluminum strip and see what it takes. Be careful of this test because the aluminum can catch fire and burn as well.
The Copper Test
Take three American pennies and lay them on a ceramic or metal plate. Place a drop of Shooter’s Choice Bore Cleaner on one of the pennies, a drop of Shooter’s Choice Copper Solvent on the second and a drop of your current bore cleaner on the third.
Look in on them at about five minute intervals. As the standard to beat, you’ll see the Shooter’s Choice cleaner’s changing color. The Copper Solvent will turn a bright blue as it dissolves the copper from the penny. If your bore cleaner isn’t attacking copper fouling, why use it?
Points to Remember
First, ALWAYS make the rifle safe prior to cleaning. Pointing the muzzle in a safe direction, open or remove the magazine and remove any ammunition. Pull the bolt to the rear, visually and physically check the chamber and remove the bolt.
Second, try to clean the bore as soon as possible after shooting. Carbon fouling is very soft when it’s fresh. This can be demonstrated during your next trip to the range. Simply pick up a just fired piece of brass and see how easily the neck fouling can be wiped off. Compare this with a piece of brass which has been allowed to cool off and you’ll see the need for immediate cleaning at the range.
Third, do not use excessive force when cleaning the bore. Using a hammer or shoe to drive an oversized cleaning patch through the bore or similar procedures will eventually degrade the performance of your weapon.
Fourth, be “solvent conscious.” In other words, remember that most cleaning solvents, when left un-checked, will destroy fiberglass bedding and some plastic stocks. If possible, clean the rifle upside down and, as a minimum, wipe up spilled solvent.
Fifth, DO NOT CONTAMINATE YOUR SOLVENT. This means you do not take a filthy bore brush and dip it into your solvent bottle. The obvious purpose of cleaning is to remove fouling. Contaminated solvent runs dissolved fouling right back into your bore. It only makes sense then to use clean chemicals, constantly wipe your cleaning rod, and use lighter fluid to protect your bore brushes.
Sixth, don’t be the outfit which buys a gallon of solvent and then has everyone standing around it dipping brushes and patches into it like it was a fondue pot. The nice thing about Shooter’s Choice Bore Cleaner is its availability in solventproof plastic squeeze bottles. In this way, after an initial purchase of squeeze bottles, they can be refilled from a larger container purchased in bulk.
Seventh, your bore cleaner or gel shouldn’t have to soak more than an hour. Copper solvent shouldn’t soak for more than 10-15 minutes. DO NOT SOAK OVERNIGHT with copper remover. Remember, for heavily fouling accumulations, I recommend using the gel to soak for an hour.
Eighth, I don’t know where the practice of reusing dirty cleaning patches started, but don’t do it.
Ninth, there is a practice I encountered in Illinois called “doing a George,” named after the student who I first caught doing it. Having been introduced to copper solvent by me, I saw that he was pulling a lot of blue patches out of his bore. It seems that he was soaking his copper bore brush with copper solvent and then scrubbing the bore with it. He would then dry patch out the dissolved copper which he had just placed up the rifle’s bore.
Tenth, if you use the gel, ALWAYS follow it with patches soaked with bore cleaner. Leaving the gel in your bore can result in higher pressures when firing live rounds and could cause injury and damage.
By the way, what was the ineffective cleaning procedure my 1000 yard marksman was using? His armorer forbade him from using anything but cleaning patches soaked in Shooter’s Choice Copper Remover. As you’ve probably guessed, all he’d been doing was polishing the carbon fouling in his bore. It took him and his classmates about three hours for their initial cleaning in the school to cut through literally months of accumulated carbon fouling.
In Conclusion
By remembering that we are dealing with two different types of fouling – the all too familiar carbon and the more insidious copper fouling – you will be able to protect your department’s investment in a long rifle, and you will be better equipped to squeeze every bit of potential out of your equipment.
Editor’s Note: This topic is taken from John C. Simpson’s book, Sniper’s Notebook. For more information on his book, contact the author at the-institute@live.com.
About the Author: John C. Simpson spent five years teaching sniping to Special Forces at the Special Warfare Center in Ft. Bragg, NC, and three years in a Special Forces unit in Germany as a team sniper and the Company Master Sniper, and finally as Chief Instructor at the 10th Special Forces Group Sniper Committee at Fort Devens, MA, before retiring in 1994 as a Sergeant First Class. While at Ft. Devens, he trained police snipers in New York and Ohio as part of Project Northstar. John is currently a Staff Instructor for Snipercraft and the Director of Precision Rifle Programs for the James River Training System. John has written many articles on sniping and precision rifle instruction for publications such as Police and Security News, Journal of Counter-terrorism, Tactical Shooter and others. He currently writes for the Snipercraft newsletter, as well as continuing to train police and military snipers.