If you take a moment to consider a police officer’s real world of work, they do not kill the enemy as the military does; they seek out lawbreakers and take them into custody. That’s a HUGE difference in tactics!

The military is constantly looking for ways to engage at greater distances (consider the dissatisfaction of the long-range killing power of the 5.56mm in Afghanistan) while cops will always have to close in on those they confront to arrest and handcuff them. Even common citizen contacts will be within earshot as conversation with police is something most want to keep “low key.” Can you imagine the uproar if officers stood back ten or 15 yards and yelled their commands? “Sir! Give me your driver’s license! We have a report you are flashing yourself at children!” Yep, that would go over great – no controversy there.
Up Close and Personal
These days, I teach far more armed citizens than I do cops and, when I teach extreme close quarter shooting, I never fail to get one student who claims, “I don’t need this. I don’t let people get close to me.” Really? So, you never stand in line at a sporting event to get tickets; wait to place your order at a food counter; ride an escalator or elevator; wait on the sidewalk to cross a street with the light; board a plane or train, etc., etc. Everyone makes close contact with other humans, whether you like it or not, and law enforcement officers make more close contacts than most other professions. Thus, if you are a student of combative pistol craft and carry a gun daily, you had better learn how to deploy and shoot it at extreme close quarter distances – what I have come to call “critical space engagements.”
Truth be told, as a police officer, you are far more likely to become involved in a confrontation which requires a lesser level of force than deadly force. While it might make you feel good to think of every threat you face as a gun problem, that is not reality. Yes, there are suspect/victim factors which come into play like age, sex, skill level or disabilities which may make the gun relevant, but the majority will require repelling an attack without shooting. This means having some skill in defensive tactics or what is more realistically called “hand-to-hand combat.” Becoming reasonably skilled in open hand techniques does not mean you must spend years learning a martial art. Kelly McCann, the founder of Crucible, where he and his staff regularly train military special mission units, intelligence operatives, private security contractors, U.N. advisors and police SWAT teams, says he can give a motivated student a good skill base in about two weeks. McCann’s “system” is based on the WWII Combatives Program taught to (American) OSS and (British) SOE operatives and is based on efficiency and simplicity. McCann also prepares the mind for conflict, “Fighting is 10% skill and 90% mental. Fights are fought in the mind.” In the end, it’s not about fancy looking technique; it’s about knowing how to fight and being willing to do so.

Time and Space
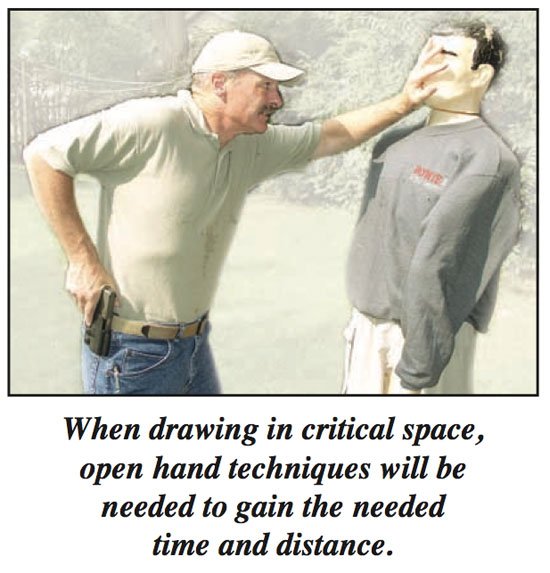
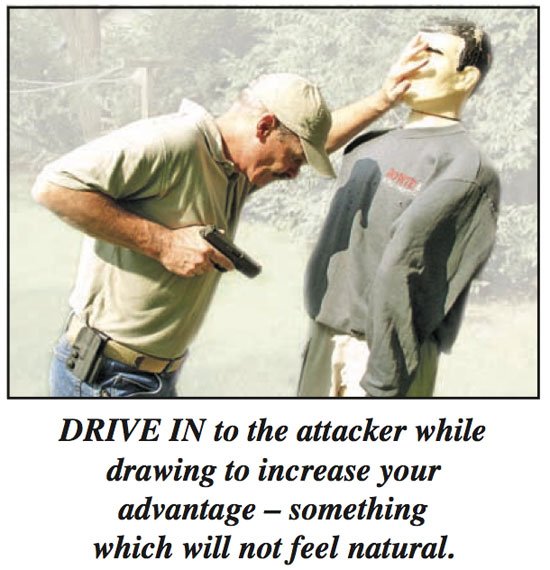
Open hand skills are necessary even if shooting is reasonable based on the circumstances at hand. At extreme close quarters, it is likely you will have to “create” the space needed to deploy the firearm. A gun will only be useful if you have the time to use it without deflection – time = distance, distance = time and time = win! The draw stroke should be the same physical action, regardless of the distance to the threat or the position in which one might find himself (or herself). Keep in mind that a fast draw is not spastic looking muscle manipulation; it is an exercise in lack of unnecessary motion. While any number of body locations can be used to carry/conceal a handgun, strong side belt mounted carry will always be the most physiologically efficient as the gun is mounted on the same side as the shoulder, arm, elbow and hand which will draw and drive it to the threat.
Carefully consider the physical action required to draw a handgun. The shoulder rotates, the elbow folds and the hand travels to the handgun, wrapping around it in a solid shooting grip which must not vary from the moment it is drawn until it is returned to the holster. It should also be understood that this must take no more than two seconds – regardless of what position the body is in. Also consider that the shooter might be involved in intense hand-to-hand combat as the draw occurs which makes me wonder why anyone would want to place their bullet launching lifeline anywhere other than their strong side? In close confines, reaching across the body to a shoulder or cross draw holster places the arm in a position where it can be easily fouled by an attacker. Also, the gun is pointed in a direction which is potentially more accessible to the attacker than the wearer.

Strong side belt carry is physiologically efficient, but where on the belt is the best location? Currently, there is a movement towards appendix carry for concealment, but it’s hardly new. Like many things, what was old becomes new again and there are a number of reasons why the appendix position is worth considering. The ability to rotate the shooting hand onto the grip from a variety of start positions and get a rapid draw is the most obvious. Additionally, a rather large gun can be carried and concealed under a relatively light garment and then drawn from a variety of positions which is appealing. The downside is that the gun can become uncomfortable when seated and, after a big meal, the gun can become “too much” when carried to the side of the navel.
Nine O’clock
I prefer the direct side of the body which is what I call nine o’clock (three for a lefty). This places the gun directly under my shoulder allowing me to use the natural way the arms folds to draw the pistol with the greatest physiological efficiency. For uniform duty carry, this is THE position for carry, but, for concealment, it is more difficult to hide as it rides on the direct side of the body. Flat holsters, like those from X-Concealment Holsters & Gear LLC, NTAC and Raven Concealment Systems, can be a real asset if you are like me and prefer this carry location. Guns worn in the natural hollow of the back above the hip are both readily accessible and easily concealed when the holster is canted, directing the grip forward. This is probably the most popular concealment location, but it does not work well for women or folks like me who have flexibility issues. Truth be told, all three of the strong side positions have advantages and disadvantages and it’s up to the end user to decide which are important and which are not.

The Draw
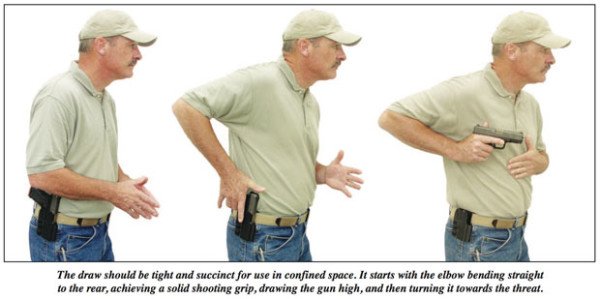
To draw consistently from the strong side belt position, the hand must travel to the holstered pistol the same way each time regardless of where it begins. This may sound odd, but consider the locations your hand might be in when you decide to draw. It could be at your side as you walk; in front of your belt as you make conversation; in a chest high fending position prior to a fight; up by the head during startle or (heaven forbid) in a hands up surrender position. Trying to just shove your hand towards the gun will result in an unsuccessful draw, especially if you have a retention device holding the pistol in the holster. The easiest way to direct the hand towards the gun is to drive the elbow to the rear and let the hand go along for the ride. The arm starts at the shoulder rotating as the elbow is bent. The hand is attached by the forearm and can only travel in one direction if the elbow is folded straight back. Doing so results in the hand ending up at belt level. To draw from the appendix or hip position, one merely needs to turn the shooting hand. A gun carried on the side of the body allows the hand to stay in alignment with the forearm. All work well; it’s just a matter of practice and preference.
To draw the gun, pull it up until the arm will not fold anymore, but without bending the upper torso to the side. This elevation is easy to recreate, making it consistent regardless of whether you are standing, sitting or supine. If lying on your back or stomach, you will likely have to rotate your upper body off the ground to gain access which is a good reason to have a strong core. Let’s be honest, fighting is a physical activity, so try to stay in shape. Once the gun is out of the holster and drawn to a position next to the rib cage, the muzzle will need to be directed towards the target. There are two ways to do this consistently: immediately turn the muzzle towards the target or rotate the elbow down.
While rotating the muzzle gets the gun directed straight forward quickly, it also “unlocks” the wrist for many people. I prefer to rotate the elbow down while keeping the wrist locked. This not only gets the gun into a weapon retention position, it also keeps the wrist locked while allowing the shooter to fire anywhere along the arc the muzzle travels, thus “zippering” a close attacker, if needed.
Bottom Line
The “Critical Space Draw” is an essential skill much like grip, trigger control or body position. It should also be understood that the draw should be the same – regardless of the distance to the attacker. It doesn’t matter if the critical space is 2.5 feet or 25 yards, the draw should be succinct, fast and get the gun on target fast. How fast? It could be the rest of your life, depending on how fast you are.
About the Author: Dave Spaulding is a 34 year veteran of law enforcement and security operations. He retired with the rank of lieutenant and worked in all facets of law enforcement, including communications, corrections, patrol, court security, investigations, undercover operations, SWAT and training. He is the author of over 1,000 articles which have appeared in law enforcement and firearms publications and is the author of two best-selling books. He was named the 2010 Law Enforcement Trainer of the Year by ILEETA and Law Officer magazine.