The information presented in this article is for discussion purposes only. It is not legal advice no actions should be taken based on it. You should consult with your department’s legal counsel for guidance.
The One-Leg-Stand (OLS) test is the final validated test in the NHTSA approved battery of three sobriety tests. Like the other two tests, the OLS is a divided attention test, meaning the subject being tested must divide their attention on several different instructions to successfully complete the test.
Operating a motor vehicle safely requires the driver to divide their attention (multi-task) on a continuous basis. You should familiarize yourself with with this concept as it helps a judge or jury understand that these tests are not meant to “fail” the tested subject, but are meant to gauge their ability to perform multiple tasks at the same time, and do them well – something a sober driver does all the time.

EDITOR’S NOTE: One Leg Stand (OLS) testing is part 5 of a DUI Training series. The other articles in the series cover Horizontal Gaze Nystagmus, Walk and Turn, Vehicle in Motion, Personal Contact and specific safety concerns when conducting DUI investigations.
The One-Leg-Stand (OLS) Test
The One-Leg-Stand test is the last test in the NHTSA validated sobriety tests. The OLS is an important test in determining the level of impairment in a suspect. As with the other NHTSA tests this test has a strict way of instructing and performing an example of the OLS. As with any of the tests I recommend to officers I instruct to take their time, focus, and learn to move right through moments of memory loss like it was a planned event. There is probably nothing more intimidating and frustrating to an officer than to appear flustered to a suspect. It WILL happen – let me teach you to overcome that fear and nail the administration of these tests.
When I became a DRE Instructor I had the opportunity to also become an SFST Instructor. Having seen so many officers struggle with not only physically demonstrating the tests, but providing the verbal instructions as well, I knew I wanted to become an instructor and find a way to make things easier. I worked with a Course Administrator to come up with a 4-step process to help officers remember all of the instructions, and be able to nail to demonstrations.
The 4-Step Instructional Process
There is a lot of information that has to be passed on during the instructional phase of the test. Proper instructions provide the sober driver the best opportunity to pass the test, and the best evidence to capture the impaired driver. In order to ensure everything is covered, and to provide natural breaks for an officer to gather his/her thoughts, we came up with a 4-Step Instructional Process:
- Starting Position Instructions
- Basic Test Overview
- Demonstration and Instructions
- Final Head-to-Toe Instructions.
Starting Position
Like the other two tests the subject should first be instructed to stand with their feet together, heels and toes touching, and their arms down to their sides. The subject should be instructed to remain in that position while the rest of the instructions are being given. Once they have assumed that position ask them, “DO YOU UNDERSTAND?” Be sure to get a verbal acknowledgment that they understand before moving on to the other instructions.
The NHTSA Manual states this test should be performed on a relatively dry, hard, and level surface. Use common sense here and go out of your way to ensure the safety of the tested person – this is your duty, but it also looks great in court.

Keep the subject in the starting position during the entire instructions phase of the test. If they step out, stop your instructions and require them to regain the starting position. Remind them that their ability to follow simple instructions is paramount to establish their level of sobriety. Note each time they sway, hop, raise their arms or step out of the starting position for your report. These are not “clues” to be scored, but are still very good observations to indicate their impaired state. More on that later.

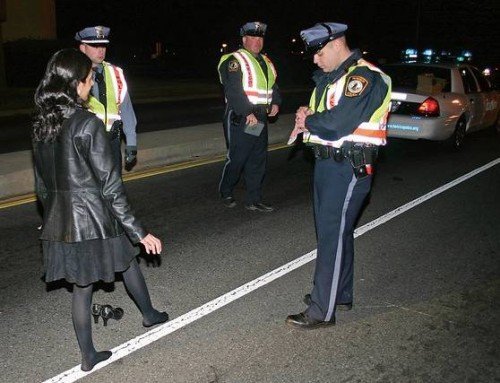
If the tested subject is wearing awkward shoes (high heels, cowboy boots, etc.) you should ask them if they want to take the test in their shoes or take their shoes off. Let them decide and get a verbal commitment either way. The only exception to this would be high heels over (2) inches in height. The NHTSA tests were not validated for these shoes, and high heels is a really easy defense to poor performance (even if the suspect chose to keep them on). This shows your impartiality in conducting the test, and a genuine allowance on behalf of the subject. Trust me, the impaired driver will give you plenty of clues of impairment without resorting to trickery.
Basic Test Overview
Like the other tests, after placing the suspect in the starting position I always give them a basic description of what I expect them to do. This looks great in court because the instructions are simple, and it gives me time to think about what I am saying and doing. If you ever get tongue-tied during instructions you can always pause and ask the subject “DO YOU UNDERSTAND?” When you’ve taken a moment to get back on track you can begin where you left off in the instructions.
The basic instructions should hit the main points of the test, and not get into specific instructions. I inform the subject when I tell them to begin they will balance on one foot, while raising the other foot approximately six inches off the ground. They will then count out loud in a manner that I will describe, and continue to count until I tell them to stop. That’s it! Simple, too the point, and easy to understand.
I then ask the subject, “DO YOU UNDERSTAND?” After getting a verbal acknowledgment they understand I move on to the next part of the instructions. Remember, if the subject says they don’t understand, ask them specifically what it is they don’t understand. Do not repeat all of the instructions again, simply repeat and clarify the part of the instructions that they do not understand. Always end with asking them “DO YOU UNDERSTAND?”
Demonstration and Detailed Instructions
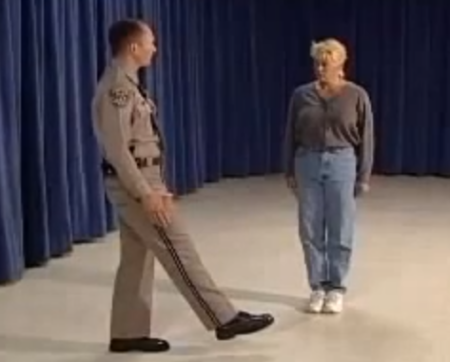
During the demonstration part of the instructions I will stand approximately 10 feet in front of them, and assume the same starting position. This allows them to clearly see my feet, and watch my demonstration of the test. It also provides me a reasonable reactionary gap if the suspect wants to attack or do some other dangerous action.
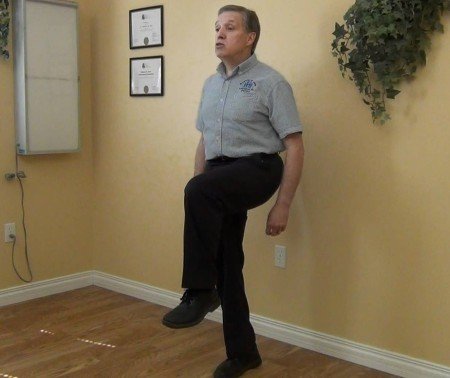
I will then explain to the suspect they will stand on one foot of their choosing, and raise the other foot approximately six inches off the ground. At that time I will raise one of my feet about six inches off the ground, and let them know that is what it will look like to do the test correctly. You need to practice this so that you know how to balance with all your duty gear on, and give an appropriate six inch example – this is important. If you cheat and only raise a couple of inches, then they will most definitely follow your lead.
I will also explain they need to keep both legs straight during the entire test. My demonstration will clearly show my raised leg to be straight out in front of me. Bending either or both legs during the test makes balancing much easier so you must watch for this and correct it if it begins to happen while you are scoring the subject. If you fail to instruct the suspect to keep both legs straight during the test you will likely end up seeing something like this:

Once I have my foot six inches off the ground I will explain and demonstrate that they need to point the toes of their raised foot so that the raised foot is parallel to the ground. This is a part of the divided attention test so do not let them cheat on this. It is easier to balance without pointing the foot parallel to the ground.
After placing my foot in the proper position I will advise the subject that they will begin counting in this manner, “one thousand one, one thousand two, one thousand three, and so on until I tell you to stop”. You don’t necessary have to use that same verbiage, but most people counting by “thousands” will get each number out in a second. So this will help you gauge intoxication level if say the suspect only counts to “one thousand fifteen” during a 30-second test. Also, DO NOT tell them the test is 30 seconds. Otherwise as soon as they reach “30” they will stop, but it may not be 30 seconds into the test.
Before placing my foot down I will remind them that during the test they need to keep their arms down to their sides, and keep both legs straight. I will then ask them, “DO YOU UNDERSTAND?” and ensure I get a verbal acknowledgment. During the instructions you should be watching the subject – DO NOT LOOK DOWN. Looking up (on the horizon) makes it a lot easier to balance then looking down at your raised foot. In addition, you want to see the earliest signs of trouble from your suspect, and you can only do that if you are looking at them.
HELPFUL HINT: One Leg Stand is challenging for officers because of all the weight displacement from our duty gear. If you find yourself off balance then slightly bend the leg you are standing on. Don’t make it obvious, but a slight bend will give you greater balance by allowing a shock absorber from weight movement and removing the rigid pivot point of a locked straight leg. Once you’ve done this, move your raised foot slightly towards the leg you are standing on, maybe even as far as directly in line with the leg your standing on. This will put your body more in line with itself and therefore more balanced. Practice this frequently, and you’ll be very surprised at how balanced you can get even with your duty gear on.
If you realize you are not going to be able to maintain your balance – DON’T FIGHT IT! Fighting the imbalance will just make you look more off balance, get you flustered, and may make you forget some of the important final instructions. Instead, simply step forward out of the stance, and ask the suspect – “DO YOU UNDERSTAND SO FAR?” If you were not able to provide a good enough demonstration than start over. If you were almost done, just move on to Final Instructions as if that is what you intended to do all along.
Always end the demonstration instructions with the question, “DO YOU UNDERSTAND?” Remember, NHTSA instructions specifically dictate that officers only re-explain parts the suspect specifically say they do not understand. We are not required to start over from the beginning. Also, we are establishing a clear foundation that the suspect claimed they understood how to do the test, so their failure to perform as instructed can be used as a sign of impairment.
Final Head-to-Toe Instructions
Now you are ready to give the person the final set of instructions. Like the WAT
test, do not try to mix the final instructions into the demonstration. More officers fail doing this and lose confidence in themselves and the tests because they try to cram too much information in while trying to maintain their balance. Unless you have high-wire balance naturally you are bound to lose your balance or rush the instructions (forgetting some along the way). Either way it makes you look foolish and unprepared. By breaking the test instructions into four distinct parts you can avoid the overwhelming pressure to throw everything at them at one time. Dividing the instructions into these four parts is also incredibly powerful in the courtroom because it makes the test easy to understand for judge and jury alike.
The final set of instructions uses the “head-to-toe” method to remember what you are going to instruct.
- HEAD – Instruct them to look down at their raised foot during the test.
- MOUTH – Remind them to count out loud “just like I did”, until you tell them to stop.
- ARMS – Their arms are to remain at their sides during the entire test.
- FEET – Keep the raised foot six inches off and parallel to the ground during the entire test.
From experience I have added an instruction about what to do if they put their foot down during the test. Too often when a subject drops their foot the first time, they simply stop performing the test – like the first time they step off the line in the WAT test. To remedy that problem I often give this final instruction – “if you happen to put your foot down during the test, regain your balance, raise your foot back into position, and continue counting where you left off.” This is not a part of the NHTSA instructions, and is not necessary, but I have found it beneficial. You decide.

Before starting the test I will ask them one more time “DO YOU UNDERSTAND?” Now, at a minimum I have asked them if they understand the test four different times, and I have not continued with instructions before getting four separate acknowledgments that they do in fact understand – great stuff in court. Be careful here. Do not accept head nodding or grunting as an acknowledgment. Request them to say “yes” or “I understand” or some other form of clear acknowledgment. Then the are locked in!
At this point you are ready to have the subject begin the test. The NHTSA standard for this test is 30-seconds, unless the suspect shows impairment signs that could cause them injury. Then it is our duty to stop the test for safety reasons. Note the observations that made you decide to end the test, and move on. Since the test is a set time you will need to have a timing device ready. A watch is always good, but lately I’ve been using the timer on my iPhone. Be ready to testify as to what device you used to verify the test was conducted for only 30-seconds.
Finally, before actually starting the test I will ask the suspect, “is there any reason you would not be able to perform the test”. DO NOT ask them if they have any medical conditions. If you do, you will open up a Pandora’s Box and get a long list of everything that has ever ailed them. They should be sufficiently aware of their capabilities and medical conditions. Having heard and seen a demonstration of the OLS test, let them come up with a reason they cannot perform the test.
As always – be reasonable! If the suspect tells you they have “bad knees” or their back hurts, get more specific answers. Make sure you don’t avoid the test for conditions we all get from time to time, and ones that should not prohibit them from doing the test. However, if the person has bad arthritis, joint replacements, current injuries then make a sound and reasonable decision on whether you should continue. You’ve already had them exit the car and walk to the starting position. Did they seem like they could do that alright, or did it look like they could barely make it due to their conditions?
I once had a one-legged driver perform the OLS test. It was Halloween, and no joke, this guy was dressed as a pirate with a fake peg leg covering is prosthesis. He had been walking on his prosthesis for 10 years. I figured if there was anyone who had learned to become balanced on one good leg it was this guy. I had him stand on his good leg during the test. He was impaired, he got arrested, and the judge accepted my reasoning in court and convicted him.
Scoring the One-Leg-Stand Test
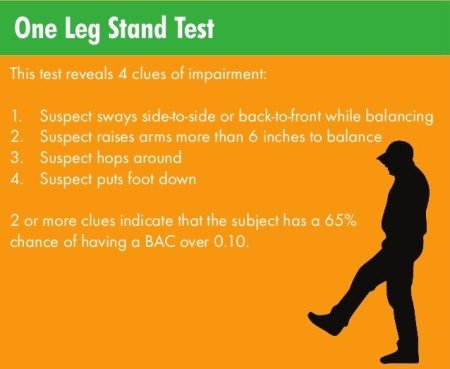
The NHTSA Manual recognizes four (4) validated clues of impairment on the OLS test. If you see two (2) or more clues then there is a high probability that the subject is impaired. All of the clues are found during the performance stage of the test, but if the subject exhibits lack of balance or the inability to follow instructions during the instructional phase those observations should be documented.

The Four (4) Clues of (OLS)
- Sways while balancing – Being fair the sway should be a minimum of one inch off center.
- Raises arms for balance – more than six inches from their sides.
- Hops – moving the foot they are balancing on is a “hop”.
- Puts foot down – try to note on what count they did this, and how many times.
Swaying – you should stand in a position that allows you to observe the subject and some stationary object in the background. This could be a utility pole, a tree, a billboard, or even your patrol car. This gives you the basis of how you measured the sway the subject exhibited. I’ve been asked this in court so be prepared to have a solid answer. Note the type of sway as well – front to back, side to side, or circular (orbital).
Raises arms for balance – requires you to observe the subject raise one or both arms more than six (6) inches from their sides. Try to document on what count they raised their arms and how many times they raised their arms in total. If they raise their arms 30 times remember that is only scored as one clue performed 30 times.
Hops – is probably one of the most incorrectly scored clues simply because too many officers are looking for the “bunny hop”. The subject does not have to jump off the ground like a pogo stick to be scored for hopping. What is most often observed is the subject begins shifting on the leg they are balancing on to try to counter the movement of their raised leg or body. Even if the foot doesn’t completely leave the ground, their body movement is causing their foot to temporarily lose traction and position with the ground. Think about what that looks like from a ground-level perspective. In order for the subject to move out of the position they were in, their foot is coming up enough to allow movement – that’s hopping, score it!
Puts foot down – No brainer here. Note on what count and how many times the subject puts their foot down. One thing to be careful of is to make sure the subject returns their foot to (6) inches with a pointed toe after they’ve put it down once. And make sure they look at their foot – the subjects will quickly start doing cheats once they realize their balance is poor.
Decision to Arrest or Not
The decision to arrest or not should never be taken lightly. There will be times you will administer tests to someone who has been drinking, but is not to the level of impairment to warrant an arrest. Good job! When we do decide to arrest, it should never be on one observation. The decision to arrest should be based upon the totality of our observations.
By the completion of the three validated sobriety tests you should be more than comfortable with the arrest/no-arrest decision. If done properly these tests have been proven to be incredibly accurate (up to 94% accurate) in identifying driver’s that are at the .08% B.A.C. level or above. The sharper you hone your skills in administering these tests, the greater the success rate you will have in snatching the .08% and .09% impaired drivers off the road. Anyone can locate the .15% driver, but a true professional should be able to remove the threats posed by drivers with lower B.A.C. levels.
In addition, the NHTSA tests showed that officers were 94% accurate in determining a person whose B.A.C. was between .04% to just under .08%. That means these tests work, and if administered and scored correctly, will give the officer great confidence in the decision to arrest or let the motorist go.
FINAL REMINDER – from the first observation of the Vehicle In Motion you should start preparing yourself for the lawyer-savvy subject who will not talk to you or perform any tests. Tune in all your senses to document the many minor details that intoxicated drivers will give you during Vehicle In Motion and the Personal Contact phases of D.U.I. investigations. That way Mr. Refuse-all doesn’t slip by, and you’re detailed report of observations will be sufficient to gain the conviction in court.
NOTE: The original NHTSA tests did not validate the tests for persons above 65 years of age, or more than 50 pounds overweight. This does not mean the tests are not valid for these groups. It just happened that during the trial tests there were not enough representation from persons over 65 years of age or over 50 pounds overweight to meet scientific validation requirements. In addition, the tests were not validated for women wearing heels more than 2″ high.
Leave a Reply